Michelle's Blog

My life as a wife, homemaker, friend, Christian

Homemade Crackers! YES! April 3, 2009

Filed under: frugal,Recipes — mrswade @ 10:32 am
Tags: ,

While attempting to buy nothing in a box and make everything I can in my own kitchen, I find a lack of snack foods.  Planning meals is one thing, but what happens if you get a little munchy before or after?!  I made biscotti, which was REALLY good but not something you can sit there an munch, it’s a one-time-snack. 🙂  Mikaela did these first and recommended them to me.  The recipe came from one of our favorite food blogs, 101cookbooks.  They were UBER good! yay 🙂

img_3286

If you have trouble tracking down semolina flour, just substitute white whole wheat flour (or all-purpose flour), it will be make a slightly different cracker but should still work. To get creative with your crackers you can top them with lots of things before baking: freshly grated cheese, artisan salts, cornmeal, a dusting of your favorite spice blend, seeds, or a wash of your favorite flavored or infused oil. You can simply cut the unbaked cracker dough into various shapes using one of those pizza cutting wheels.

1 1/2 cups semolina flour
1 1/2 cups white whole wheat flour (or all-purpose flour)
1 teaspoon fine-grain sea salt
1 cup warm water
1/3 cup extra virgin olive oil

special equipment: pasta machine (optional)

Whisk together the flours and salt. Add the water and olive oil. Using a mixer with a dough hook attachment mix the dough at medium speed for about 5 – 7 minutes. Alternately, feel free to mix and then knead by hand on a floured counter-top. The dough should be just a bit tacky – not too dry, not too sticky to work with. If you need to add a bit more water (or flour) do so.

When you are done mixing, shape the dough into a large ball. Now cut into twelve equal-sized pieces. Gently rub each piece with a bit of olive oil, shape into a small ball and place on a plate. Cover with a clean dishtowel or plastic wrap and let rest at room temperature for 30 – 60 minutes.

While the dough is resting, preheat your oven to 450F degrees. Insert a pizza stone if you have one.

When the dough is done resting, flatten one dough ball. Using a rolling pin or a pasta machine, shape into a flat strip of dough – I can usually get down to the 4 setting on my pasta machine w/o trouble. Pull the dough out a bit thinner by hand (the way you might pull pizza dough). You can also cut the dough into whatever shape you like at this point. Set dough on a floured (or cornmeal dusted) baking sheet, poke each cracker with the tines of a fork to prevent puffing, add any extra toppings, and slide into the oven (onto the pizza stone). Repeat the process for the remaining dough balls, baking in small batches. If you don’t have a pizza stone, bake crackers a few at a time on baking sheets. Bake until deeply golden, and let cool before eating – you will get more crackery snap.

I added some of my fresh herbs – thyme and rosemary, garlic salt, parmesan, seasoning salt and sage.  They were all VERY good and very easy!
 

Tomato Mozzarella Casserole

Filed under: frugal,Recipes — mrswade @ 10:12 am
Tags: , , , , ,

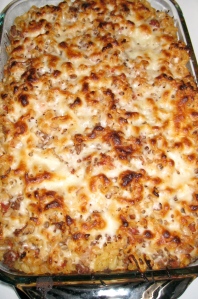
This one’s from my very dear friend Mikaela.  🙂  I was a little nervous about it at first because I’m really not a casserole fan, and I thought it would be really heavy because of the cheese.  NOT SO! It was AAAAAmazing! 🙂 yum!  

We took her suggestion to add some meat (but I accidentally added too much, so it didn’t all fit in the pan.  It’s ok though, because I had a make-shift spaghetti for lunch the next day with the noodles that didn’t fit. 🙂 

img_3047

Ingredients

  • 1 lb. dry pasta (recipe calls for Ziti, but I used rotini… really, any short, sturdy pasta will work)
  • 1/2 lb lean ground beef or turkey
  • 1- 14 oz. can diced tomatoes
  • 1 – 32 oz. can crushed tomatoes
  • 2 cloves garlic
  • 1 Tbls. vegetable oil
  • 2 Tbls. Fresh chopped basil (or 2 tsp. dried – I used Italian Herb Seasoning instead)
  • 1/2 tsp. (or more) salt
  • 1/4 tsp. sugar
  • 8 oz (2 cups) shredded mozzarella cheese
  • 1/4 cup. grated parmesan cheese
Directions
Cook pasta according to package in a large pot.  Drain, reserving 1/2 cup of the cooking water.  Put back in pot and set aside.  In a 12″ skillet, cook ground beef.  When done, drain off fat and rinse in a colander and add minced garlic cook until until tender, but do not brown.  Add tomatoes and simmer until slightly thickened, about 15 minutes.  Stir in basil, sugar, and salt.  Add sauce to the pasta and toss, adding the reserved pasta water as needed to loosen sauce.  
Preheat oven to 400 degrees.  Spread 1/2 of the pasta mixture into an oiled 9 x 13 baking pan.  Sprinkle 1/2 of each type of cheese over the top.  Spread the rest of the pasta mixture, then the rest of the cheese.  Bake for 20 minutes.  Let cool for 5 minutes before serving.
Thanks Mikaela!
 

Dressings

Filed under: frugal,Recipes — mrswade @ 9:52 am
Tags: , ,

Again, I’m stealing these recipes from Lindsay over at Passionate Homemaking.  I love salads, but usually the only dressing Jake and I ever had on hand was ranch, it seemed way too expensive to get a bunch of other kinds of dressings, especially since they all had high fructose corn syrup in them.  I knew you could make salad dressing but pretty much thought that consisted of balsamic vinegar and olive oil.  Not so!  I made Italian, Caesar, Ranch and Creamy Lemon Poppyseed.  yuuuum! 


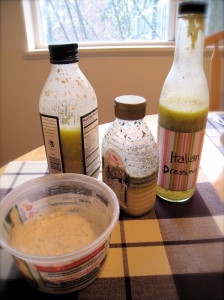
In front: Ranch in an old grated parmesan tub. In back from left to right: Caesar in an old olive oil bottle, Creamy Lemon Poppyseed in an old honey bottle and Italian in an old vanilla syrup bottle.

In front: Ranch in an old grated parmesan tub. In back from left to right: Caesar in an old olive oil bottle, Creamy Lemon Poppyseed in an old honey bottle and Italian in an old vanilla syrup bottle.

Ranch

Jake and I normally only like Hidden Valley Buttermilk Ranch and really don’t like the kind you find at parties that is really thick.  This stuff is in consistency more like the party dip ranch, but I like it just as much as the Hidden Valley.  Jake still prefers Hidden Valley but likes this stuff as well.  It’s very thick, but you could probably thin it out with some milk.

  • 1 cup mayonaise
  • 1/2 cup sour cream
  • 1/2 tsp dried chives (I never have used these, as I don’t keep them on hand)
  • 1/2 tsp dried parsley
  • 1/2 tsp. dried dill weed
  • 1/4 tsp garlic powder
  • 1/4 tsp onion powder
  • 1/8 tsp salt

Caesar

This recipe doesn’t have a raw egg in it, which I’ve heard that the majority of caesar dressings have, I may try a different one after this one is gone, but this one is really good.

  • 1 cup olive oil
  • 1 Tbls. red wine vinegar
  • 1/4 cup lemon juice
  • 1 Tbls. Worcestershire sauce
  • 2 Tbls. anchovy paste (did not add, I am not a fan!)
  • 1/2 tsp dijon style mustard
  • 1 clove garlic
  • 3 Tbls. sour cream
  • 1/2 cup grated Parmesan cheese
  • 1/8 tsp ground pepper

Creamy Lemon Poppyseed

I wanted to try a poppyseed dressing, this one is really good but I have found two others that I really want to try.  This amount fit perfectly in my honey bottle, so if you use yours up, put it right back in. 🙂  Yummy with fruit, nuts and cheese on the salad.

  • 1/3 cup honey
  • 1/2 cup lemon juice
  • 1/4 cup mayonnaise
  • 1 tsp. Dijo-style mustard
  • 1/2 tsp salt
  • 1/3 cup olive oil
  • 1 Tbls. poppy seeds

Italian 

I haven’t had this one more than once, but it was really good when I had it and Italian is Jakes favorite.  This one is easy to make and is a good staple salad dressing.

  • 1 cup of olive oil
  • 1/2 cup of Apple cider vinegar
  • 1 teaspoon of onion powder
  • 2 tablespoon of whole grain mustard or dijion type mustard
  • 2-3 cloves of garlic minced
  • 1/2 teaspoon of thyme
  • 1/2 teaspoon of basil
  • 1 teaspoon salt
  • A pinch of Stevia, or 2-4 teaspoons of sugar or natural sweeter

Combine all ingredients and mix well before using.


Also,  note on making dressings.  If the dressings call for oil, add it last.  Combine all the herbs, spices, salts, sugar, etc in the vinegar first because they dissolve better in vinegar, the oil keeps things more separated.  Once everything is dissolved, then add the oil and shake! 🙂  

ENJOY!


Sour Cream Cookies March 19, 2009

Filed under: Recipes — mrswade @ 11:48 am
Tags: , , ,

again…no picture, imagine a snickerdoodle but fluffier, smaller and not perfectly round…

This is another recipe from the lovely Allissa Alvord

Ingredients

  • 1 c Shortening (I used butter, which I think made them spread out wider than Allissa’s)
  • 2 c Sugar
  • 1 t Vanilla (I always use more vanilla than called for 🙂 )
  • 1 c Sour Cream
  • 3 t baking powder
  • 1/2 t baking soda
  • 5 c Flour

Mix it all together (flour last of course).  I used 2 spoons to spoon mine onto the baking sheet.  When they are on the sheet, dip the bottom of a cup in cinnamon-sugar and lightly press the ball of dough to make it flat on top (but don’t squish it!)  Bake at 350 for 12 mins.  They are done even if they are the same color and haven’t browned at all.

I love these cookies, Allissa always has them when I go over to babysit and was so glad she gave me the recipe!  They really remind me of snickerdoodles! mmmmmm 🙂 

ENJOY


Salsa (well, actually, pico de gallo) March 8, 2009

Filed under: frugal,Recipes — mrswade @ 4:26 pm
Tags: , , , , , ,

Tonight is a taco night and I made some homemade salsa to go with it 🙂  It super easy, uber delicious, fresh and a fun way to get some veggies!

img_3019

What I used

  • 3 1/3 tomatoes
  • 3/4 white onion
  • 1/4 red onion
  • 1 jalapeno pepper (w/o the insides and the seeds)
  • cilantro to taste
  • a couple squirts of lime juice to taste
  • salt and pepper to taste


Chop it all up, (use a food processor for the tomatoes if you want the salsa a little more juicy and less chunky) and mix it together, it’s super easy!

It’s also super cheap!  the cilantro and jalapeno were less than a dollar, onions and tomatoes aren’t that expensive either and this made way more than a traditional tub of salsa 🙂


It works! – Homemade Deodorant

Filed under: frugal,home,Recipes — mrswade @ 3:56 pm
Tags: , ,

I read on one of my new favorite blogs, passionate home making, about the wonders of Coconut Oil and how you can use it in homemade deodorant (see original post here)!  I have some armpit issues (sorry if this is in TMI, I’m sure you’ll get over it).  They get very irritated after I shave, itch like crazy the night after I shave and definitely aren’t the best smelling (I blame this on my dad, thanks dad).  I was also excited about this because the aluminum that is in standard antiperspirant/deodorants are thought to cause and/or increase risk of breast cancer.  I was pretty nervous about making this deoderant at home because 1. coconut oil is super expensive, 2. nothing works for my armpits.  I made it on friday and tested it out saturday morning after I shaved.  The first sign of amazingness was that it didn’t sting at all after I shaved.  I completely forgot I had it on all day (didn’t sweat at all, though it wasn’t hot and I didn’t really do anything that active).  That night I remembered I had it on and did a little sniff check, NOTHING! I asked Jake to smell it and he stuck his nose in my pit and said he couldn’t really smell anything.  Of course,  you can always smell a little something, but I couldn’t get close enough to smell anything on myself.  Jake did a 1-pit experiment with the homemade in one pit and Old Spice in the other.  I LOVE his old spice and his natural scent, but I actually like the homemade side more and could barely smell anything!  Anyway, I would really suggest this, especially for women, be natural, stay sweet smelling and breast cancer free!

coconut_oil


Ingredients:

  • Coconut oil
  • baking soda
  • arrowroot powder or cornstarch

Combine equal portions of baking soda & corn starch (Passionate Homemaking uses about 1/4 cup each) Then slowly add coconut oil and work it in with a spoon until it maintains the substance you desire (Passionate Homemaking uses approx 5-6 Tbls). It should be about the same texture as the store bought kind. You can either scoop this into your old dispensers or place in a small container with lid and apply with fingers with each use. After applying the product, you can just rub the remains into your hands as a lotion!


Simple Whole Wheat Bread February 25, 2009

Filed under: Recipes — mrswade @ 6:20 pm
Tags: , , ,

Two posts in one day! wowee!  On monday I made homemade bread which I was a little nervous about, but it was O-SO-delicious!  It makes 3 loaves, which I would have known had I read ahead in the instructions, quite a pleasant surprise when I was only expecting one loaf!

Home-made Wheat Bread

Home-made Wheat Bread

Ingredients

  • 3 cups warm water (110 degrees F/45 degrees C)
  • 2 (.25 ounce) packages active dry yeast
  • 1/3 cup honey
  • 5 cups bread flour
  • 3 tablespoons butter, melted
  • 1/3 cup honey
  • 1 tablespoon salt
  • 3 1/2 cups whole wheat flour
  • 2 tablespoons butter, melted

Directions

  1. In a large bowl, mix warm water, yeast, and 1/3 cup honey. Add 5 cups white bread flour, and stir to combine. Let set for 30 minutes, or until big and bubbly.
  2. Mix in 3 tablespoons melted butter, 1/3 cup honey, and salt. Stir in 2 cups whole wheat flour. Flour a flat surface and knead with whole wheat flour until not real sticky – just pulling away from the counter, but still sticky to touch. This may take an additional 2 to 4 cups of whole wheat flour. Place in a greased bowl, turning once to coat the surface of the dough. Cover with a dishtowel. Let rise in a warm place until doubled.
  3. Punch down, and divide into 3 loaves. Place in greased 9 x 5 inch loaf pans, and allow to rise until dough has topped the pans by one inch.
  4. Bake at 350 degrees F (175 degrees C) for 25 to 30 minutes; do not overbake. Lightly brush the tops of loaves with 2 tablespoons melted butter or margarine when done to prevent crust from getting hard. Cool completely

I am going to keep making this bread, possibly as our main bread, for lunches and such.  I am also going to use all whole wheat flower instead of 5 cups white, 2 cups whole wheat.  I’m not sure if it’s cost effective to make my own bread, but it sure is yummier and makes me very happy.  Also, I think there is probably less crap in it than the store bought stuff, even though we already get bread that doesn’t have high fructose corn syrup.

ENJOY!


Crab Stuffed Zucchini November 21, 2008

Filed under: Recipes — mrswade @ 10:52 am
Tags: , , , ,

This recipe was UBER nummy and actually pretty easy!

Ingredients:

3 medium zucchini, halved lengthwise


2 tablespoons hard margarine (or butter)


1/2 cup finely chopped onion


2 garlic cloves, minced (or 1/2 teaspoon powder)


1 (6-ounce) can of crabmeat, drained, cartilage removed, flaked


1/2 cup grated Swiss cheese


1/3 cup crumbled feta cheese (about 1 1/2 ounce)


1 large egg, fork-beaten


1 tablespoon all-purpose flour


1 tablespoon chopped fresh parsley (or 3/4 teaspoon flakes)


2 teaspoons chopped fresh dill (or 1/2 teaspoon dill weed)


1 teaspoon paprika


1/4 teaspoon pepper

Directions:

Scoop out pulp from each zucchini, leaving 1/2 inch thick shells. Arrange shells in single layer on greased baking sheet. Chop pulp.

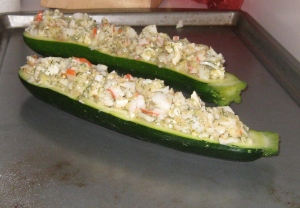
Zucchini before the oven

Zucchini before the oven


Melt margarine in small frying pan on medium-high. Add onion and garlic. Cook for 3 to 5 minutes, stirring often, until onion starts to soften. Add zucchini pulp. Stir. Transfer to medium bowl.

Add remaining 9 ingredients. Stir well. Spoon into zucchini

 shells. Bake in 375ºF oven for about 30 minute until filling is set

Michelle’s Notes:

Since I was cooking for 2 (not 6) I used 1 zucchini and halved the filling recipe.  I used olive oil instead of butter (lil bit healthier), I used imitation crab (I think it’s cheaper, but I didn’t look for canned crab), I accidentally used too much dill and no parsley.  It still tasted great!  That is what I love about recipe’s, most of them are just guidelines, improvising is so much more fun that being super strict about it!  

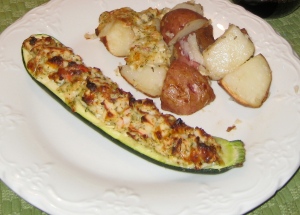
I served it with roasted red potatoes and had a bit extra crab filling so I pilled it on the potatoes as you can kind of see in the picture.

My Zucchini with the potatoes

My Zucchini with the potatoes

untitled1

Zucchini from thenest.com

 I think mine looks better 🙂  But it looked even better in person, I need to work on my food photography!